Website Setup
This guide explains how to integrate ConnectNow into your website or online store.
ConnectNow can be integrated into a wide range of digital properties without requiring complex infrastructure changes.
Supported Website Types
You can integrate ConnectNow with:
- Shopify stores
- Websites built using HTML, CSS, and JavaScript
- Web applications built with React, Vue, Angular, or similar frameworks
Option 1: Setup on a Shopify Store
Follow these steps to enable ConnectNow on your Shopify store.
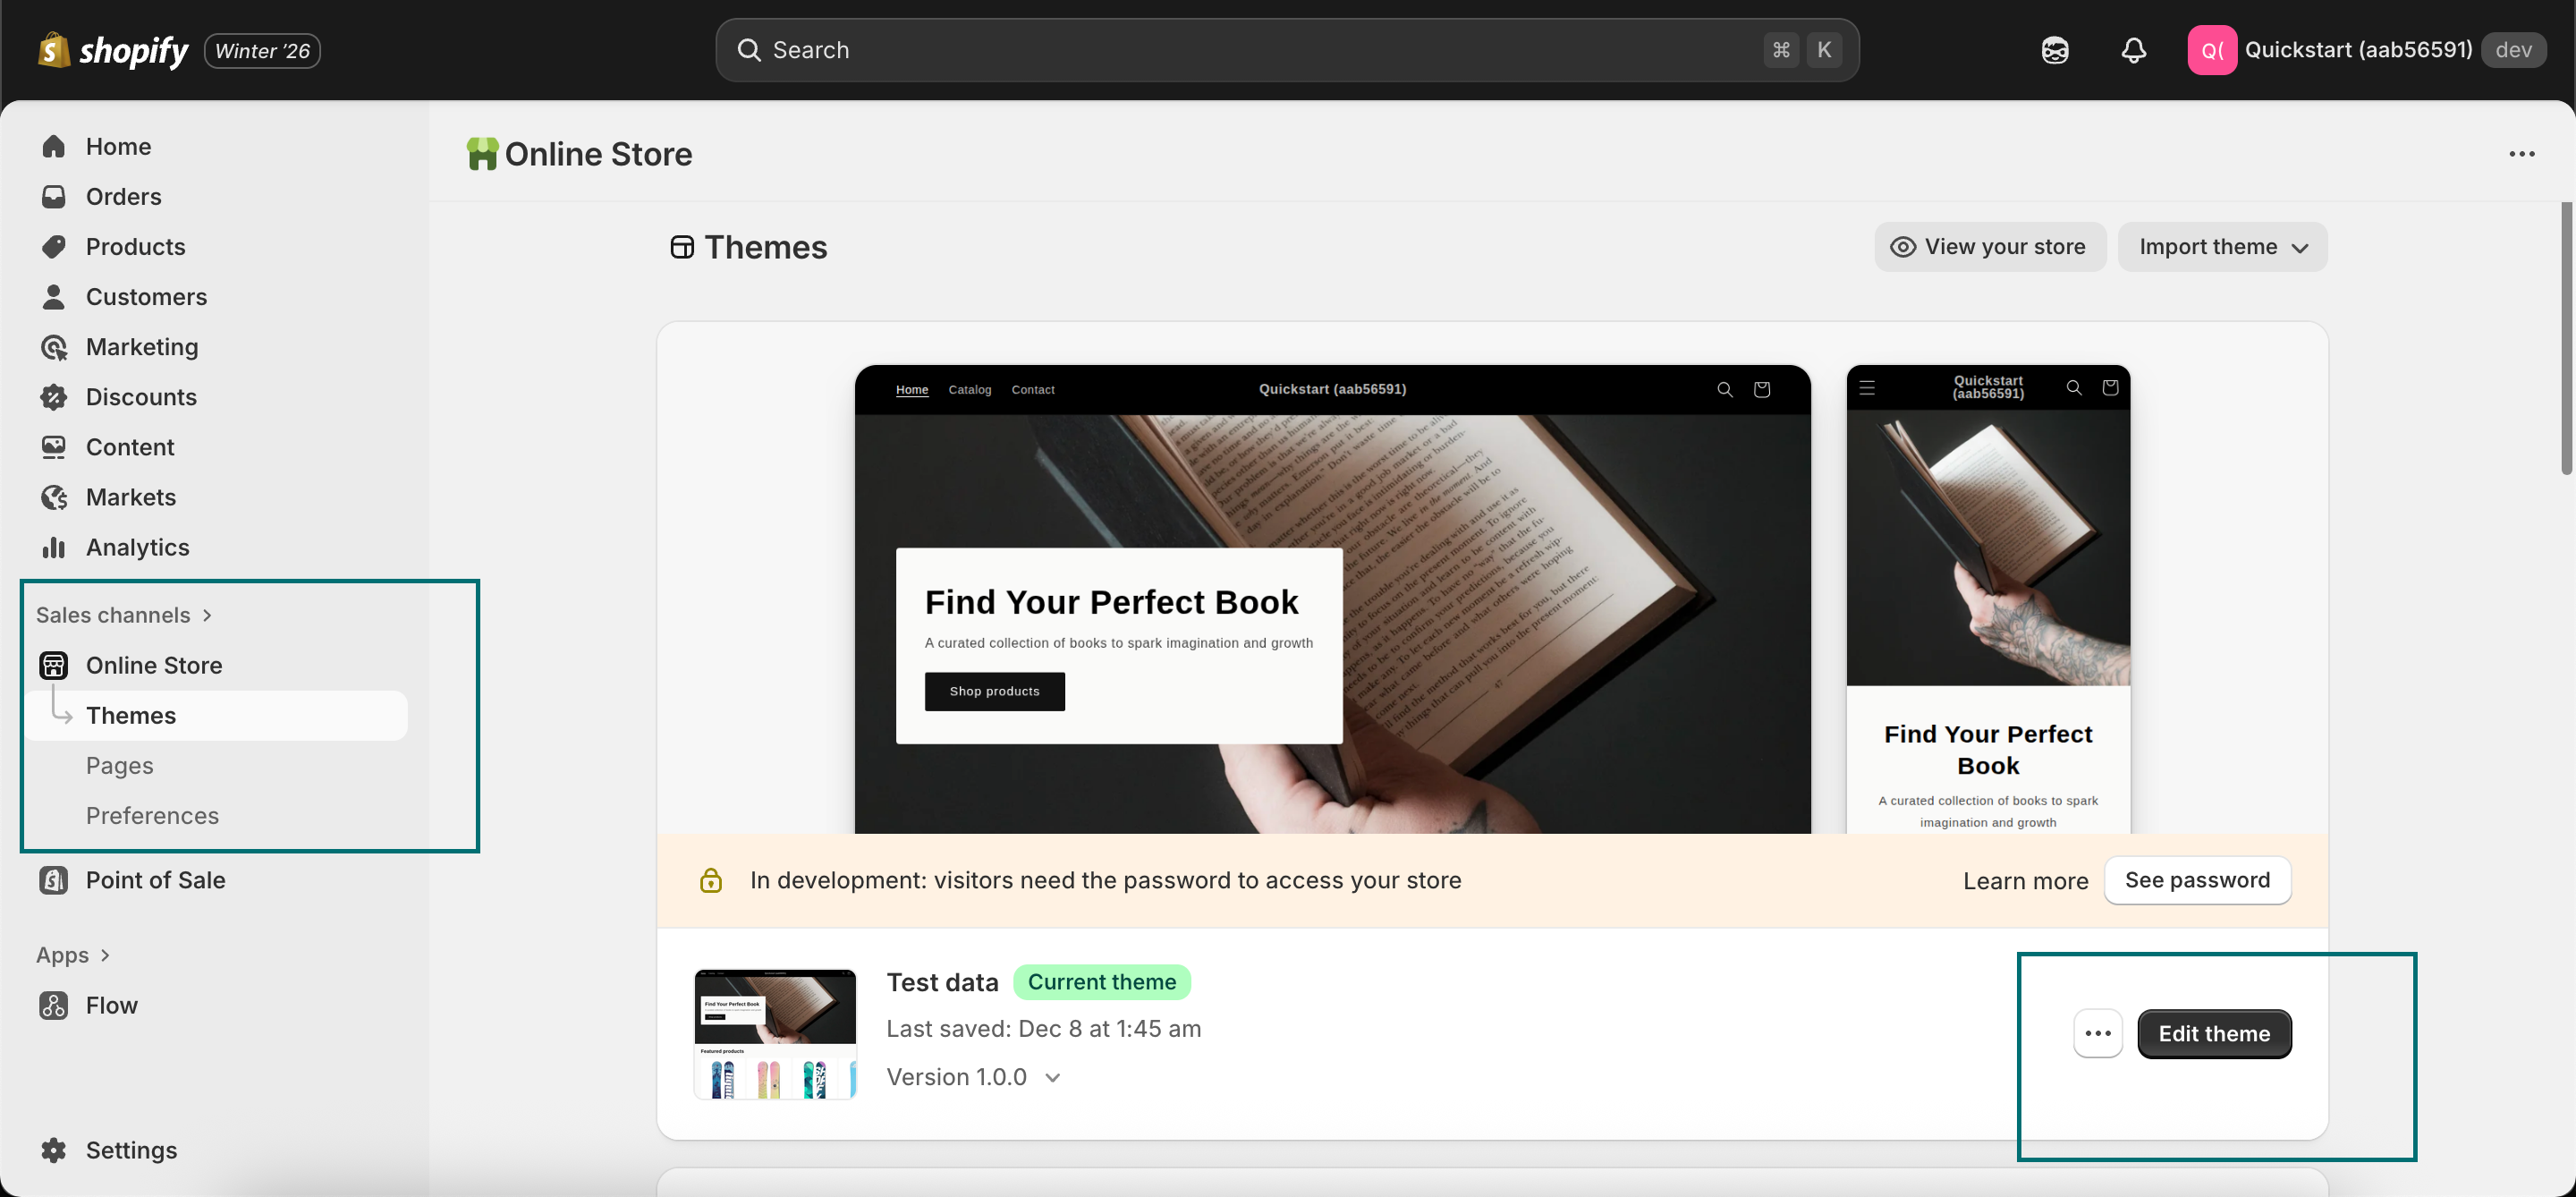
Step 1: Open Theme Editor
- Log in to https://admin.shopify.com
- Go to Online Store → Themes
- Locate your active theme
- Click Edit theme
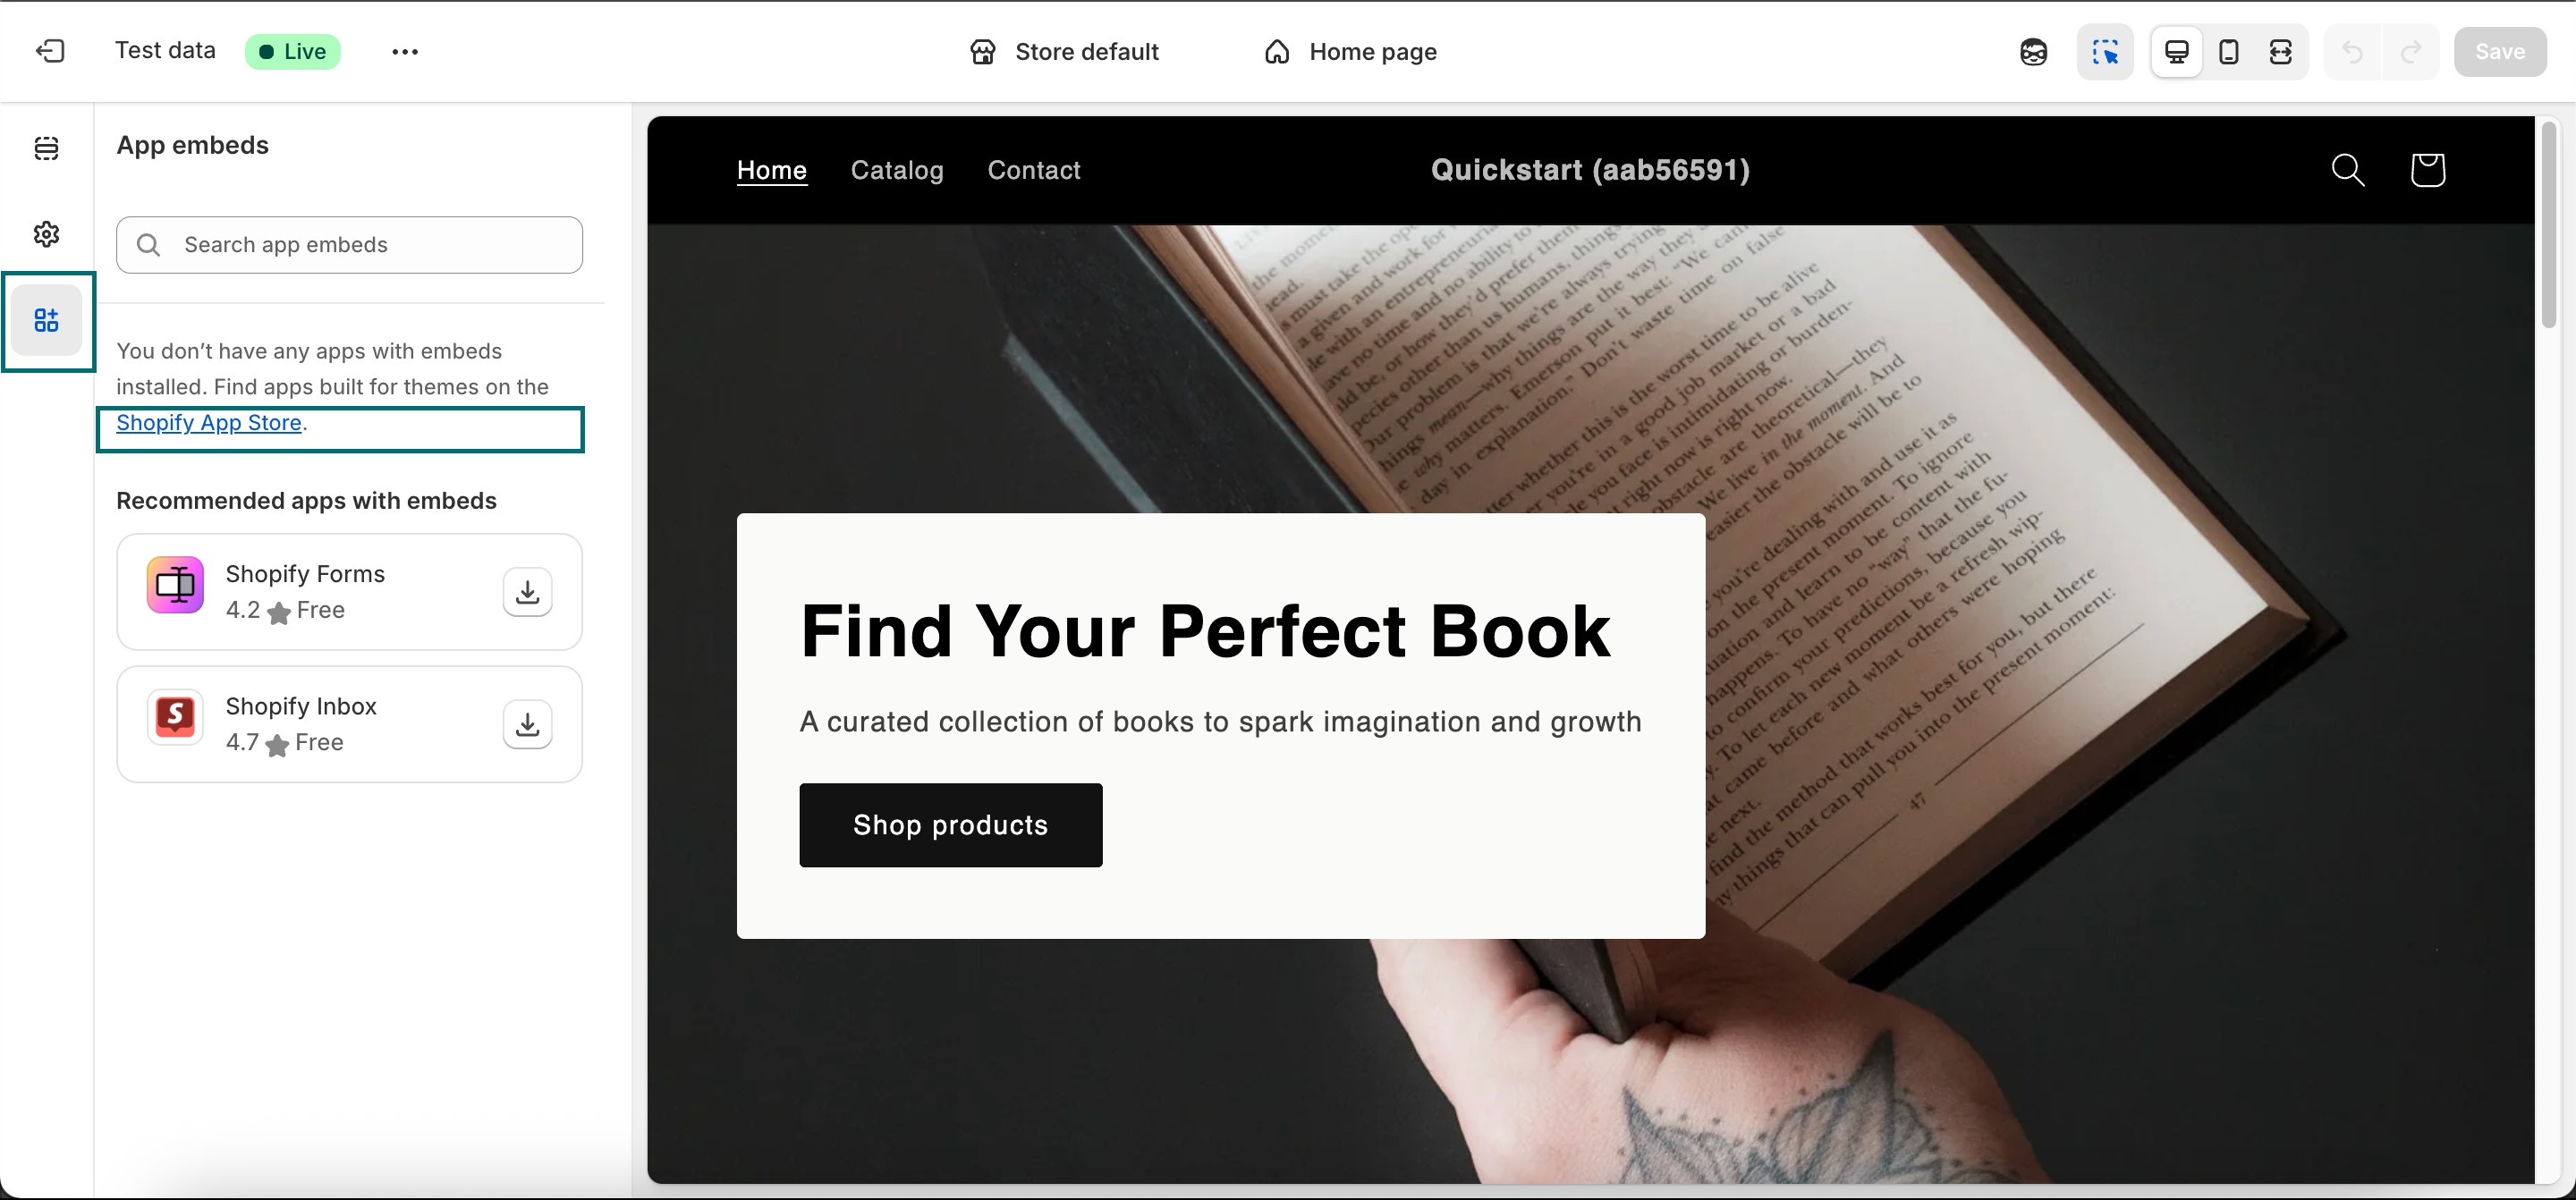
Step 2: Open App Embeds
- Click App embeds from the left-side menu
- Click the Shopify App Store link
Important
Do not close this tab. You will need it later.
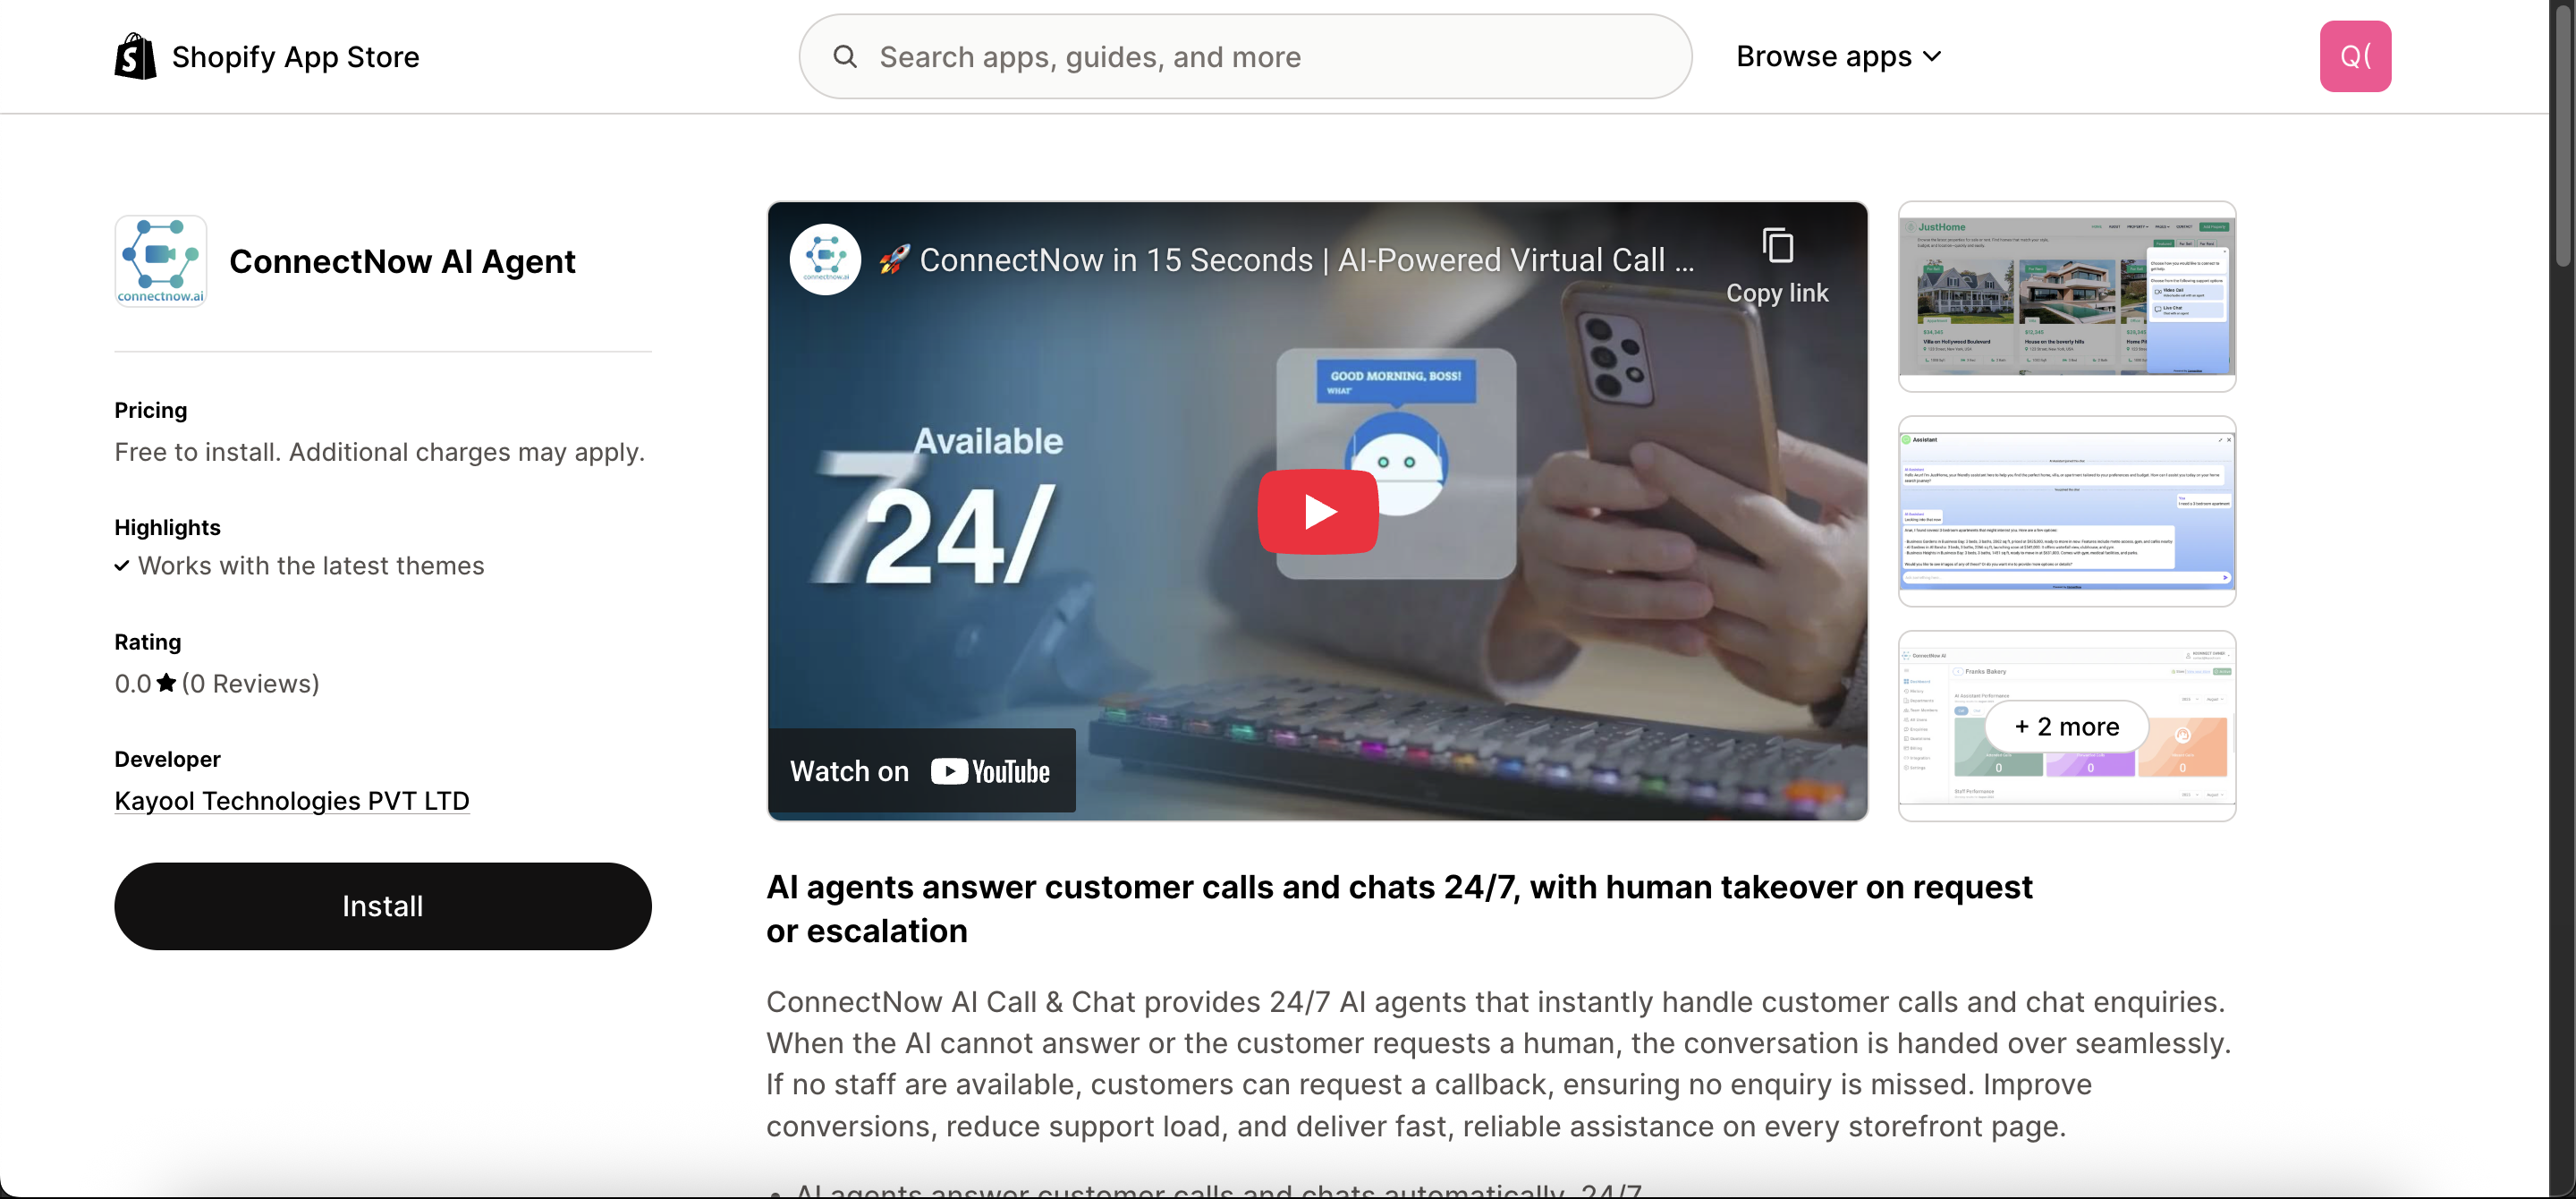
Step 3: Install ConnectNow App
- Search for ConnectNow AI Agent
- Click Install
- Complete the Shopify installation steps
After installation, you will be redirected to the ConnectNow app screen.
Step 4: Login or Register
- If you already have a ConnectNow account, click Login
- Otherwise, click Register and follow the steps in - Create an Account
Complete the ConnectNow setup wizard.
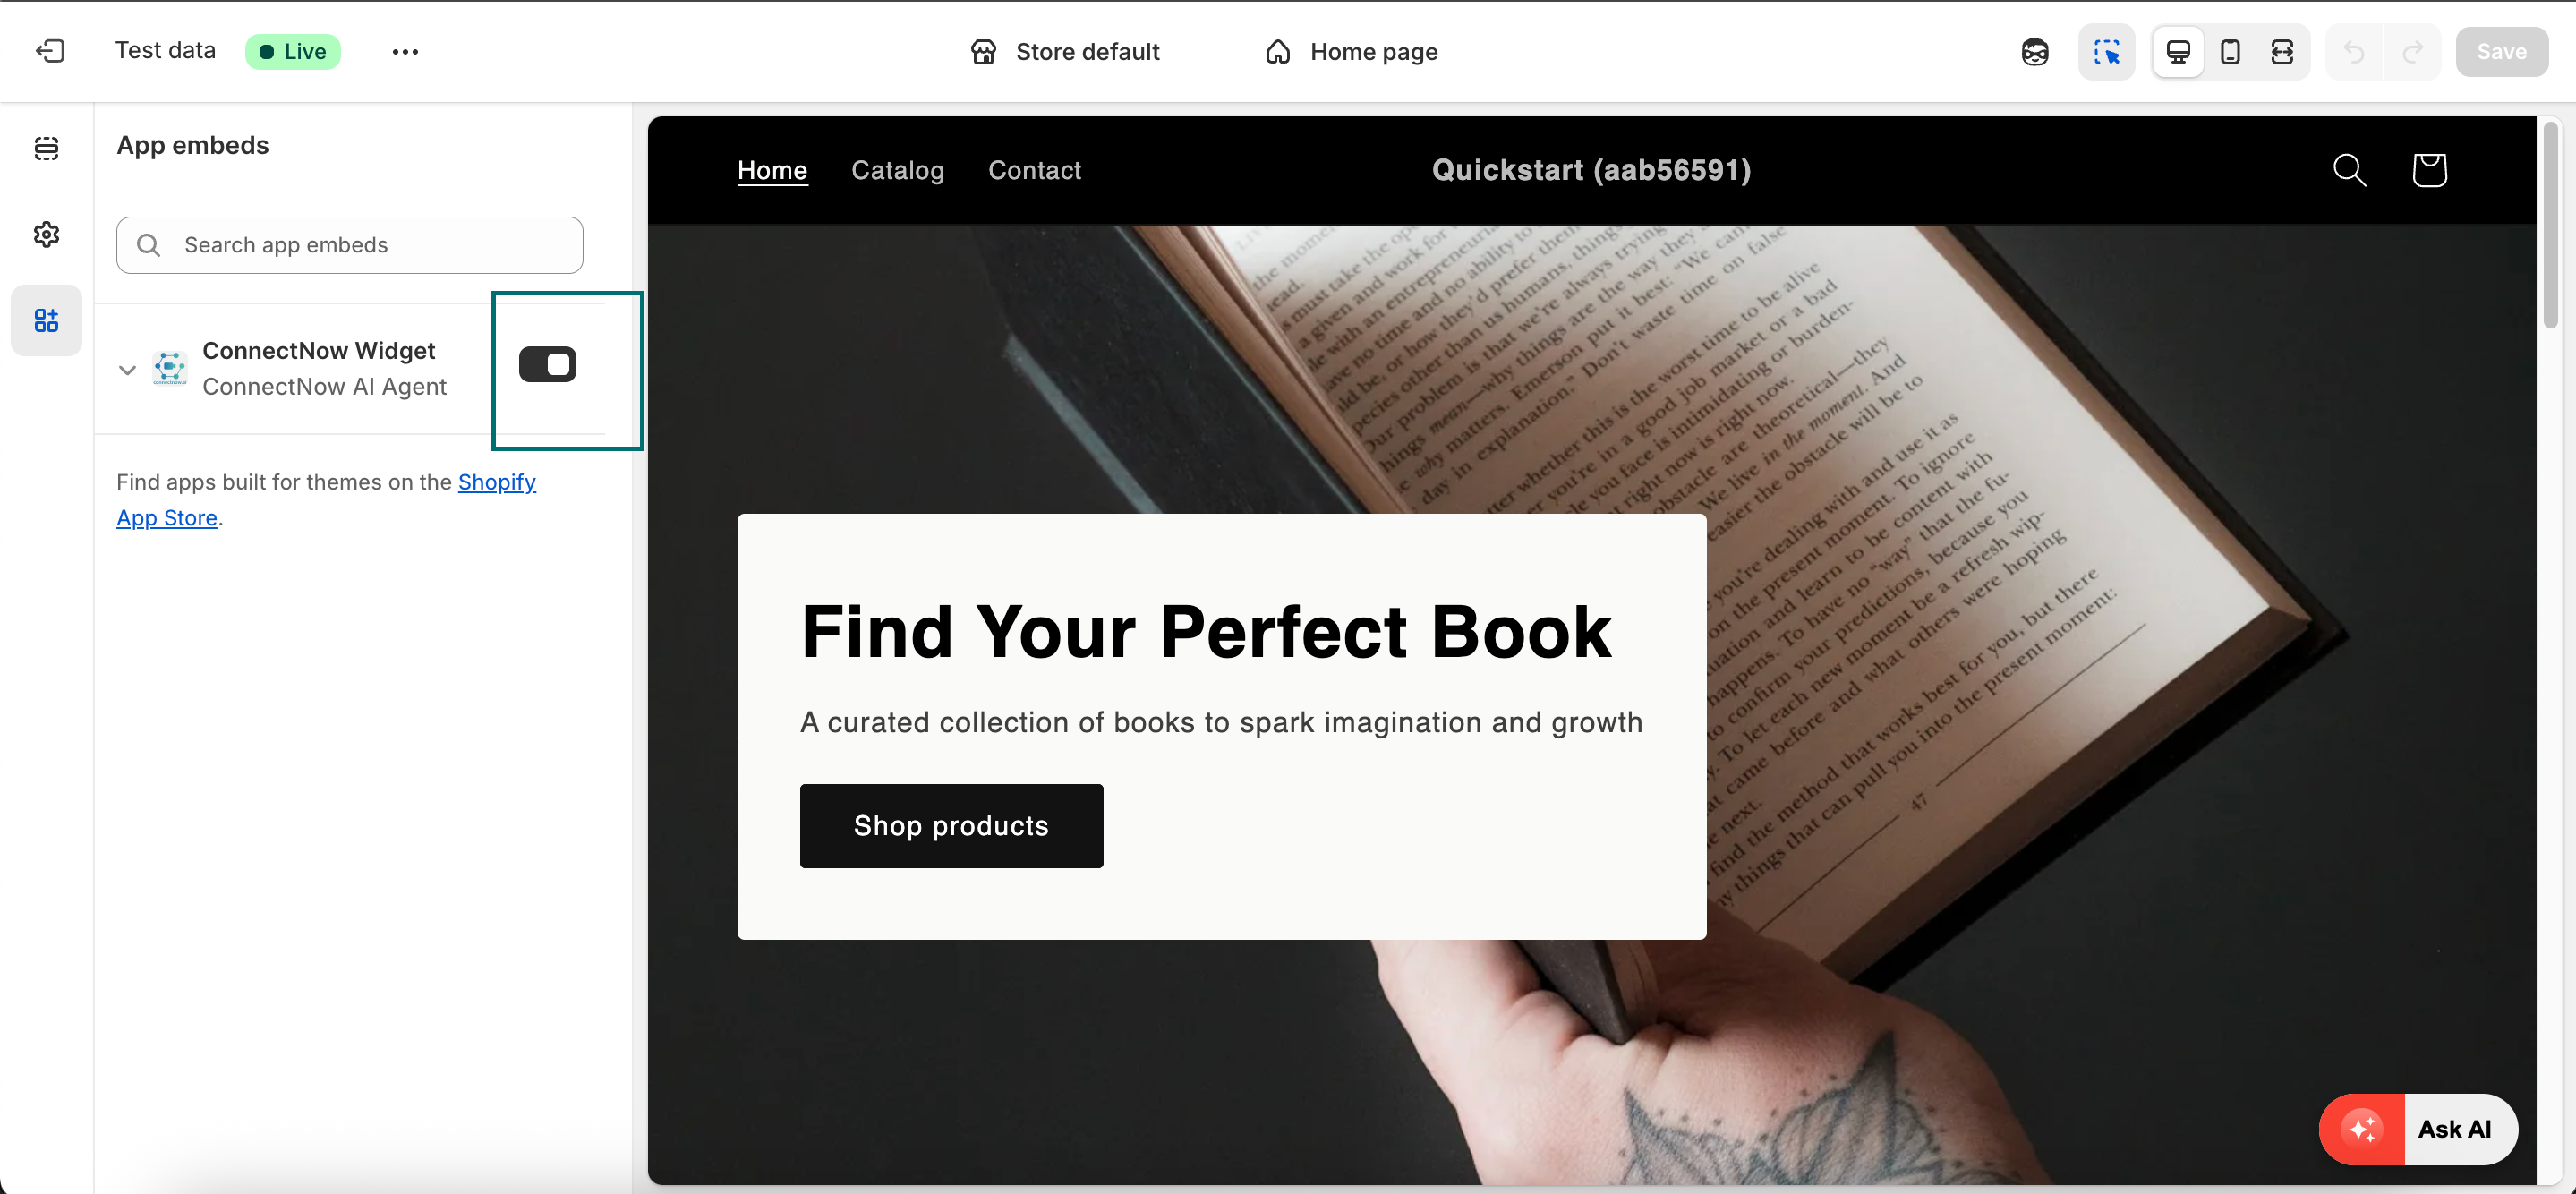
Step 5: Enable the App in Theme
If the app was not enabled during setup:
- Return to the Edit theme tab
- Refresh the page
- Open App embeds
- Enable ConnectNow AI Agent
- Click Save
The ConnectNow button will appear at the bottom-right corner of your store.
Step 6: Test
- Open the Preview of your store
- Click the ConnectNow button
- Verify chat or call functionality
Demo Video
Below is a short demo that walks through the installation and setup steps above.
Option 2: Setup on Other Websites
Use this method for non-Shopify websites or custom web applications.
Step 1: Add the ConnectNow Script
- Go to ConnectNow Dashboard → Integration
- Copy the script provided under the integration steps
Sample script:
<script src="https://iframeapi.connectnow.ai?key=<yourkey>"></script>
Paste this script inside the <head> section of your website.
Example HTML structure:
<html>
  <head>
    <meta charset="UTF-8" />
    <title>My Website</title>

    <script src="https://iframeapi.connectnow.ai?key=<yourkey>"></script>
  </head>

  <body>
    <!-- Website content -->
  </body>
</html>
Step 2: Add the Floating Button
Copy the floating button HTML code and paste it before the closing </body> tag.
<button class="ask-ai-button kayool-meet">
  <span style="background-color: #e74c3c" class="ask-ai-button-decor"></span>
  <div class="ask-ai-button-content">
    <div style="background-color: #e74c3c" class="ask-ai-button-icon">
      <svg
        width="24"
        xmlns="http://www.w3.org/2000/svg"
        fill="none"
        viewBox="0 0 36 36"
      >
        <circle
          fill="url(#icon-lightning-cat_svg__paint0_linear_379_8580)"
          r="18"
          cy="18"
          cx="18"
          opacity="0.5"
        />
        <g transform="translate(6,6)">
          <path
            fill="#fff"
            d="M19,1L17.74,3.75L15,5L17.74,6.26L19,9L20.25,6.26L23,5L20.25,3.75M9,4L6.5,9.5L1,12L6.5,14.5L9,20L11.5,14.5L17,12L11.5,9.5M19,15L17.74,17.74L15,19L17.74,20.25L19,23L20.25,20.25L23,19L20.25,17.74"
          >
            <animate
              attributeName="opacity"
              values="1;0;1"
              dur="1s"
              repeatCount="indefinite"
            />
          </path>
        </g>
        <defs>
          <linearGradient
            id="icon-lightning-cat_svg__paint0_linear_379_8580"
            x1="18"
            y1="0"
            x2="18"
            y2="36"
            gradientUnits="userSpaceOnUse"
          >
            <stop stop-color="#fff" stop-opacity="0.71" />
            <stop offset="1" stop-color="#fff" stop-opacity="0" />
          </linearGradient>
        </defs>
      </svg>
    </div>
    <span style="color: #e74c3c" class="ask-ai-button-text">Ask AI</span>
  </div>
</button>
Step 3: Add CSS Styles
Add the following CSS to your website’s main CSS file or inside a <style> block.
.ask-ai-button {
  box-shadow: rgba(0, 0, 0, 0.24) 0px 3px 8px;
  position: fixed;
  right: 10px;
  bottom: 10px;
  border: none;
  border-radius: 1.5rem;
  background-color: #ffffff;
  cursor: pointer;
  padding: 0;
  overflow: hidden;
  z-index: 9999;
}

.ask-ai-button-decor {
  position: absolute;
  inset: 0;
  transform: translateX(-100%);
  transition: transform 0.3s;
  z-index: 0;
}

.ask-ai-button-content {
  display: flex;
  align-items: center;
  position: relative;
  font-weight: 600;
}

.ask-ai-button-icon {
  width: 48px;
  height: 40px;
  display: grid;
  place-items: center;
}

.ask-ai-button-text {
  padding: 12px 24px;
  font-size: 14px;
  font-weight: 500;
  transition: color 0.2s;
  white-space: nowrap;
}

.ask-ai-button:hover .ask-ai-button-text {
  color: #ffffff !important;
}

.ask-ai-button:hover .ask-ai-button-decor {
  transform: translateX(0);
}
The example below shows a complete working HTML file with:
- ConnectNow script
- Floating button HTML
- Required CSS styles
You can adapt this example to your project structure.
Sample Full HTML File
<!DOCTYPE html>
<html lang="en">
  <head>
    <meta charset="UTF-8" />
    <title>My Website with ConnectNow</title>

    <!-- ConnectNow Embed Script -->
    <script src="https://iframeapi.connectnow.ai?key=<yourkey>"></script>

    <!-- ConnectNow Button Styles -->
    <style>
      .ask-ai-button {
        box-shadow: rgba(0, 0, 0, 0.24) 0px 3px 8px;
        position: fixed;
        right: 10px;
        bottom: 10px;
        border: none;
        border-radius: 1.5rem;
        background-color: #ffffff;
        cursor: pointer;
        padding: 0;
        overflow: hidden;
        z-index: 9999;
      }

      .ask-ai-button-decor {
        position: absolute;
        inset: 0;
        transform: translateX(-100%);
        transition: transform 0.3s;
        z-index: 0;
      }

      .ask-ai-button-content {
        display: flex;
        align-items: center;
        position: relative;
        font-weight: 600;
      }

      .ask-ai-button-icon {
        width: 48px;
        height: 40px;
        display: grid;
        place-items: center;
      }

      .ask-ai-button-text {
        padding: 12px 24px;
        font-size: 14px;
        font-weight: 500;
        transition: color 0.2s;
        white-space: nowrap;
      }

      .ask-ai-button:hover .ask-ai-button-text {
        color: #ffffff !important;
      }

      .ask-ai-button:hover .ask-ai-button-decor {
        transform: translateX(0);
      }
    </style>
  </head>

  <body>
    <h1>Welcome to My Website</h1>
    <p>This page demonstrates ConnectNow integration.</p>

    <!-- ConnectNow Floating Button -->
    <button class="ask-ai-button kayool-meet">
      <span
        style="background-color: #e74c3c"
        class="ask-ai-button-decor"
      ></span>
      <div class="ask-ai-button-content">
        <div style="background-color: #e74c3c" class="ask-ai-button-icon">
          <svg
            width="24"
            xmlns="http://www.w3.org/2000/svg"
            fill="none"
            viewBox="0 0 36 36"
          >
            <circle
              fill="url(#icon-lightning-cat_svg__paint0_linear_379_8580)"
              r="18"
              cy="18"
              cx="18"
              opacity="0.5"
            />
            <g transform="translate(6,6)">
              <path
                fill="#fff"
                d="M19,1L17.74,3.75L15,5L17.74,6.26L19,9L20.25,6.26L23,5L20.25,3.75M9,4L6.5,9.5L1,12L6.5,14.5L9,20L11.5,14.5L17,12L11.5,9.5M19,15L17.74,17.74L15,19L17.74,20.25L19,23L20.25,20.25L23,19L20.25,17.74"
              >
                <animate
                  attributeName="opacity"
                  values="1;0;1"
                  dur="1s"
                  repeatCount="indefinite"
                />
              </path>
            </g>
            <defs>
              <linearGradient
                id="icon-lightning-cat_svg__paint0_linear_379_8580"
                x1="18"
                y1="0"
                x2="18"
                y2="36"
                gradientUnits="userSpaceOnUse"
              >
                <stop stop-color="#fff" stop-opacity="0.71" />
                <stop offset="1" stop-color="#fff" stop-opacity="0" />
              </linearGradient>
            </defs>
          </svg>
        </div>
        <span style="color: #e74c3c" class="ask-ai-button-text">Ask AI</span>
      </div>
    </button>
  </body>
</html>
Step 4: Test the Integration
- Take a backup of your website
- Deploy the changes
- Open the website in a browser
- Verify that the ConnectNow button appears
- Test chat or call functionality
Important Requirements
- Your website must use HTTPS
- A valid SSL certificate is required
- ConnectNow will not work on non-secure (HTTP) websites
Best Practices
- Test the integration on a staging environment first
- Ensure the floating button does not overlap important UI elements